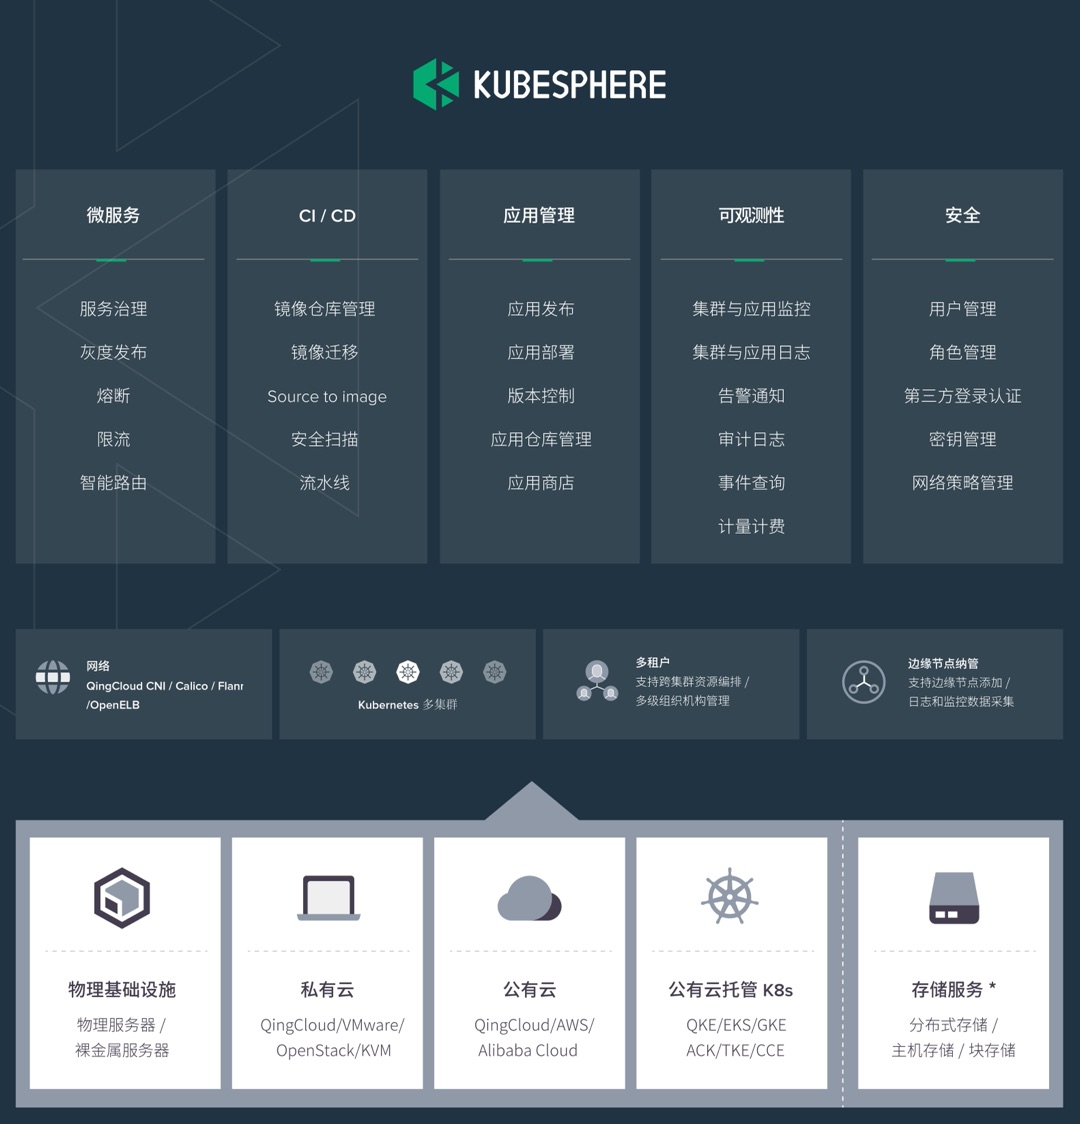
KubeSphere是国内的青云开发的一款开源的,在 Kubernetes 之上构建的面向云原生应用的分布式操作系统。有非常完善的界面,对开发运维非常友好。
一台机子直接搭建KubeSphere+Kubernetes,适用于尝鲜,实际使用还是建议集群,要不然发挥不了k8s的作用。
【注意】除了硬件最低配置至少为2核CPU、4G内存、40G存储之外,如果hostname包含大写字母也会有问题,需要修改hostname,不能包含大写字母
1
2
3
4
5
|
# 改成自己的hostname
$ sudo vim /etc/hostname
$ sudo vim /etc/hosts
# 重启
$ sudo systemctl reboot
|
需要安装一些依赖项:
1
|
sudo apt-get -y install socat conntrack ebtables ipset
|
记得关闭防火墙
下载KubeKey:
1
2
3
|
$ curl -sfL https://get-kk.kubesphere.io | VERSION=v3.0.7 sh -
$ chmod +x kk
$ ./kk create cluster --with-kubernetes v1.22.12 --with-kubesphere v3.3.2
|
【注意】众所周知的原因,很多时候本地比如安装包、docker git等操作的时候会出现网络问题。推荐的一种方式是路由器挂梯子然后让linux走代理,具体方式不便叙述。
单节点偏向于试用,不适合实际的部署,就不细说了。
这是相对个人而言比较通用的一种方案,高可用方案一般最少也要6台机器,实在是没这个财力。
我目前只有两个节点,采用简单的一个master,两个worker的方案,其中master自己也可以作为worker调度pod
| 节点 |
配置 |
角色 |
ip |
| master |
16核32G |
control-plane,master,worker |
192.168.50.2 |
| node1 |
4核16G |
worker |
192.168.50.31 |
建议所有的机子都用root账号,没有的话可以先配置一下root账号的密码:
并且允许ssh root登录
1
2
3
|
$ sudo vim /etc/ssh/sshd_config
# 修改为:PermitRootLogin yes
$ service sshd restart
|
每台机子也都安装一下那几个软件。
确保每台机子都能ping通其他的机子,都能通过root ssh登录其他机子。
创建 cluster config
1
|
./kk create config --with-kubesphere v3.3.2
|
配置该yaml config文件,主要是上面这部分,注意最好都用root账号,ip均为内网ip
 1
 2
 3
 4
 5
 6
 7
 8
 9
10
11
|
  hosts:
  - {name: master, address: 192.168.50.2, internalAddress: 192.168.50.2, user: root, password: "xxx"}
  - {name: node1, address: 192.168.50.31, internalAddress: 192.168.50.31, user: root, password: "xxx"}
  roleGroups:
    etcd:
    - master
    control-plane:
    - master
    worker:
    - master
    - node1
|
通过该配置创建Kubesphere和Kubernetes,大约需要等接近十分钟。
 1
 2
 3
 4
 5
 6
 7
 8
 9
10
11
12
13
14
15
16
17
18
19
20
21
22
23
24
25
26
27
28
29
30
31
32
33
34
35
36
37
38
39
40
41
42
43
44
45
46
47
48
49
50
51
52
53
54
55
56
57
|
$ ./kk create cluster -f cluster-cfg.yaml


 _   __      _          _   __
| | / /     | |        | | / /
| |/ / _   _| |__   ___| |/ /  ___ _   _
|    \| | | | '_ \ / _ \    \ / _ \ | | |
| |\  \ |_| | |_) |  __/ |\  \  __/ |_| |
\_| \_/\__,_|_.__/ \___\_| \_/\___|\__, |
                                    __/ |
                                   |___/

21:27:57 CST [GreetingsModule] Greetings
21:27:58 CST message: [node1]
Greetings, KubeKey!
21:27:58 CST message: [master]
Greetings, KubeKey!
21:27:58 CST success: [node1]
21:27:58 CST success: [master]
21:27:58 CST [NodePreCheckModule] A pre-check on nodes
21:27:58 CST success: [master]
21:27:58 CST success: [node1]
21:27:58 CST [ConfirmModule] Display confirmation form
+--------+------+------+---------+----------+-------+-------+---------+-----------+--------+--------+------------+------------+-------------+------------------+--------------+
| name   | sudo | curl | openssl | ebtables | socat | ipset | ipvsadm | conntrack | chrony | docker | containerd | nfs client | ceph client | glusterfs client | time         |
+--------+------+------+---------+----------+-------+-------+---------+-----------+--------+--------+------------+------------+-------------+------------------+--------------+
| master | y    | y    | y       | y        | y     |       |         | y         |        | 23.0.1 | 1.6.18     | y          |             |                  | CST 21:27:58 |
| node1  | y    | y    | y       | y        | y     |       |         | y         |        | 24.0.2 | 1.6.21     |            |             |                  | CST 21:27:58 |
+--------+------+------+---------+----------+-------+-------+---------+-----------+--------+--------+------------+------------+-------------+------------------+--------------+

This is a simple check of your environment.
Before installation, ensure that your machines meet all requirements specified at
https://github.com/kubesphere/kubekey#requirements-and-recommendations

Continue this installation? [yes/no]: yes

...中间省略


#####################################################
##              Welcome to KubeSphere!           ###
#####################################################

Console: http://192.168.50.2:30880
Account: admin
Password: P@88w0rd
NOTES:
  1. After you log into the console, please check the
     monitoring status of service components in
     "Cluster Management". If any service is not
     ready, please wait patiently until all components
     are up and running.
  2. Please change the default password after login.

#####################################################
https://kubesphere.io             2023-05-29 21:36:54
#####################################################
|
KubeSphere提供了一些可拔插的组件,有很多非常好用,这里尽量都启用一下:
在定制资源定义搜索clusterconfiguration,ks-installer右边选择编辑yaml来修改。
多节点安装的yaml config,将store修改为true
1
2
3
|
openpitrix:
  store:
    enabled: true
|
跟上面类似,修改这里即可:
1
2
|
devops:
  enabled: true
|
1
2
3
4
5
6
7
|
events:
  enabled: true
logging:
  enabled: true
  logsidecar:
    enabled: true
    replicas: 2
|
1
2
3
4
5
6
7
8
9
|
servicemesh:
  enabled: true
  istio:
    components:
      cni:
        enabled: false
      ingressGateways:
        - enabled: false
          name: istio-ingressgateway
|
然后保存配置,等待一段时间即可。
查看更新进度:
1
|
kubectl logs -n kubesphere-system $(kubectl get pod -n kubesphere-system -l 'app in (ks-install, ks-installer)' -o jsonpath='{.items[0].metadata.name}') -f
|
局域网ip+端口可以正常访问搭建的Kubesphere了,但是如果在外面使用会很不方便,而且ip和端口比较难记,因为没有公网ip,考虑采用frp内网穿透+nginx转发来配置。
frpc配置:
1
2
3
4
5
|
[master_kubesphere]
type = tcp
local_ip = 192.168.50.2
local_port = 30880
remote_port = 30880
|
买号域名,搞好证书,由于Kubesphere有很多api,有些还采用了wss,所以nginx还需要做很多额外的配置,否则很多地方会出问题,下面是我的配置:
  1
  2
  3
  4
  5
  6
  7
  8
  9
 10
 11
 12
 13
 14
 15
 16
 17
 18
 19
 20
 21
 22
 23
 24
 25
 26
 27
 28
 29
 30
 31
 32
 33
 34
 35
 36
 37
 38
 39
 40
 41
 42
 43
 44
 45
 46
 47
 48
 49
 50
 51
 52
 53
 54
 55
 56
 57
 58
 59
 60
 61
 62
 63
 64
 65
 66
 67
 68
 69
 70
 71
 72
 73
 74
 75
 76
 77
 78
 79
 80
 81
 82
 83
 84
 85
 86
 87
 88
 89
 90
 91
 92
 93
 94
 95
 96
 97
 98
 99
100
101
102
103
104
|
server {
    listen 443 ssl;
    server_name kubesphere.engine.wang;
    ssl_certificate /home/ubuntu/nginx/cert/kubesphere.engine.wang.crt;
    ssl_certificate_key /home/ubuntu/nginx/cert/kubesphere.engine.wang.key;
    ssl_session_timeout 5m;
    ssl_protocols TLSv1 TLSv1.1 TLSv1.2;
    ssl_ciphers ECDHE-RSA-AES128-GCM-SHA256:HIGH:!aNULL:!MD5:!RC4:!DHE;
    ssl_prefer_server_ciphers on;

    client_max_body_size 1024m;

    location / {
        proxy_set_header HOST $host;
        proxy_set_header X-Forwarded-Proto $scheme;
        proxy_set_header X-Real-IP $remote_addr;
        proxy_set_header X-Forwarded-For $proxy_add_x_forwarded_for;
        proxy_pass http://10.0.16.14:30880;
    }
    location /wsapp {
        proxy_pass http://10.0.16.14:30880;
        proxy_http_version 1.1;
        proxy_set_header Upgrade $http_upgrade;
        proxy_set_header Connection "Upgrade";
    }
    location /api/v1/watch {
        proxy_pass http://10.0.16.14:30880;
        proxy_http_version 1.1;
        proxy_set_header Upgrade $http_upgrade;
        proxy_set_header Connection "Upgrade";
    }
    location /apis/apps {
        proxy_pass http://10.0.16.14:30880;
        proxy_http_version 1.1;
        proxy_set_header Upgrade $http_upgrade;
        proxy_set_header Connection "Upgrade";
    }
    location /apis/app.k8s.io/v1beta1/watch {
        proxy_pass http://10.0.16.14:30880;
        proxy_http_version 1.1;
        proxy_set_header Upgrade $http_upgrade;
        proxy_set_header Connection "Upgrade";
    }
    location /apis/apps/v1/namespaces {
        proxy_http_version 1.1;
        proxy_redirect off;
        proxy_pass http://10.0.16.14:30880;
        proxy_set_header Host http://10.0.16.14:30880;
        proxy_set_header Upgrade $http_upgrade;
        proxy_set_header X-Forwarded-Proto $scheme;
        proxy_set_header X-Forwarded-For $proxy_add_x_forwarded_for;
    }
	location /apis/batch/v1/watch {
        proxy_pass http://10.0.16.14:30880;
        proxy_http_version 1.1;
        proxy_set_header Upgrade $http_upgrade;
        proxy_set_header Connection "Upgrade";
    }
    location /apis {
        proxy_http_version 1.1;
        proxy_pass http://10.0.16.14:30880;
        proxy_redirect off;
        proxy_set_header Host http://10.0.16.14:30880;
        proxy_set_header X-Real-IP $remote_addr;
        proxy_set_header X-Forwarded-For $proxy_add_x_forwarded_for;
    }
    location /kapis/resources.kubesphere.io/v1alpha2/namespaces {
        proxy_http_version 1.1;
        proxy_pass http://10.0.16.14:30880;
        proxy_redirect off;
        proxy_set_header        Host $host:$server_port;
        proxy_set_header        X-Real-IP $remote_addr;
        proxy_set_header        X-Forwarded-For $proxy_add_x_forwarded_for;
        proxy_connect_timeout  3600s;
        proxy_read_timeout  3600s;
        proxy_send_timeout  3600s;
    }
    location /kapis/resources.kubesphere.io/ {
        proxy_http_version 1.1;
        proxy_redirect off;
        proxy_pass http://10.0.16.14:30880;
        proxy_set_header    Host $host:$server_port;
        proxy_set_header    Upgrade $http_upgrade;
        proxy_set_header    X-Forwarded-Proto $scheme;
        proxy_set_header    Connection "upgrade";
        proxy_set_header    X-Forwarded-For $proxy_add_x_forwarded_for;
    }

    location /kapis/terminal.kubesphere.io/ {
        proxy_http_version 1.1;
        proxy_redirect off;
        proxy_pass http://10.0.16.14:30880;
        proxy_set_header    Host $host:$server_port;
        proxy_set_header    Upgrade $http_upgrade;
        proxy_set_header    X-Forwarded-Proto $scheme;
        proxy_set_header    Connection "upgrade";
        proxy_set_header    X-Forwarded-For $proxy_add_x_forwarded_for;
    }
}
server {
     listen 80;
     server_name kubesphere.engine.wang;
     return 301 https://$host$request_uri;
}
|
打开https://kubesphere.engine.wang,即可进入我搭建的Kubesphere了:
新建企业空间,新建用户并分配给企业空间,做权限隔离