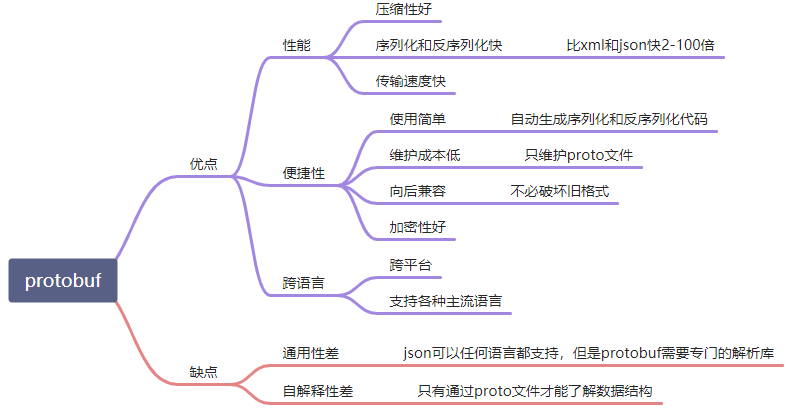
是Protocol Buffers的简称,由Google开源,是一种轻便高效的结构化数据存储语言,定位是类似xml、json这样的数据描述语言。protobuf可以跨语言和跨平台。
官方页面:https://developers.google.com/protocol-buffers
对等的: dubbo、rmi、hessian、messagepack等协议
https://developers.google.com/protocol-buffers/docs/proto3
目前都使用proto3版本,下面讲解如何编写proto文件来定义我们的结构。
注释还是//和/**/
 1
 2
 3
 4
 5
 6
 7
 8
 9
10
11
12
13
14
15
16
|
syntax = "proto3";

package proto;
option go_package = "/";

service HelloService {
  rpc Hello(HelloRequest) returns (HelloResponse) {}
}

message HelloRequest {
  string request = 1;
}

message HelloResponse {
  string response = 1;
}
|
第一行指明版本,目前是第三版。
后面通过service定义一个服务,通过message关键字定义了一个包含一个或多个Feild的结构体,message定义一个消息格式,每个字段都有一个唯一的数值标签。
https://developers.google.com/protocol-buffers/docs/proto3#scalar
singular表示有0或1个,通常不写
repeated表示字段可以包含0-N个元素
1
2
3
4
5
6
|
message World {
  string name = 1
}
message HelloRequest {
  repeated World worlds = 1
}
|
注意这里的Field包含不同的id
可以在message中嵌套其他message结构体
1
2
3
4
5
6
7
|
message A {
  string n = 1;
}

message B {
  A a = 1;
}
|
希望消息体包含多个字段,但同时只允许一个字段
1
2
3
4
5
6
|
message A {
  oneof name {
    string nick_name = 1;
    string true_name = 2;
  }
}
|
1
2
3
|
message A {
  map<string, string> a = 1;
}
|
比如说option go_package = "./proto;user";
是什么意义,其中分号之前的表示生成的文件放在什么目录下面
下面简单讲解一下在Golang中如何使用Protocol Buffer
1
|
protoc --go_out=./ --micro_out=./ ./*.proto
|
这里先从一个最简单的讲起,proto文件如下:
 1
 2
 3
 4
 5
 6
 7
 8
 9
10
11
12
13
14
15
16
|
syntax = "proto3";

package proto;
option go_package = "/";

service HelloService {
  rpc Hello(HelloRequest) returns (HelloResponse) {}
}

message HelloRequest {
  string request = 1;
}

message HelloResponse {
  string response = 1;
}
|
首先先会为在proto中定义的mesage结构生成结构体,并增加三个都有的字段:
1
2
3
4
5
6
7
|
type HelloRequest struct {
	state         protoimpl.MessageState
	sizeCache     protoimpl.SizeCache
	unknownFields protoimpl.UnknownFields

	Request string `protobuf:"bytes,1,opt,name=request,proto3" json:"request,omitempty"`
}
|
对于rpc方法,生成服务端和客户端的对应方法,首先是服务端接口:
1
2
3
4
5
|
// HelloService的Server端接口,包含一个在proto里定义的Hello方法
// 这里参数符合grpc,分别是context和*req,返回的是*rep和err
type HelloServiceServer interface {
	Hello(context.Context, *HelloRequest) (*HelloResponse, error)
}
|
服务端注册:
1
2
3
|
func RegisterHelloServiceServer(s *grpc.Server, srv HelloServiceServer) {
	s.RegisterService(&_HelloService_serviceDesc, srv)
}
|
然后是客户端接口以及方法的实现:
 1
 2
 3
 4
 5
 6
 7
 8
 9
10
11
12
13
|
// 这里不一样的是多了一个option参数,这里可以传递一些选项
type HelloServiceClient interface {
	Hello(ctx context.Context, in *HelloRequest, opts ...grpc.CallOption) (*HelloResponse, error)
}

func (c *helloServiceClient) Hello(ctx context.Context, in *HelloRequest, opts ...grpc.CallOption) (*HelloResponse, error) {
	out := new(HelloResponse)
	err := c.cc.Invoke(ctx, "/proto.HelloService/Hello", in, out, opts...)
	if err != nil {
		return nil, err
	}
	return out, nil
}
|
参考:
- https://developers.google.com/protocol-buffers/docs/gotutorial